Wednesday, March 27, 2013

Thank You Card

Today I decided to play along with Hand Stamped Sentiments and participate in their sketch challenge #156. I made a "Thank You" card using one of my favorite word stamp sets, Sassy Salutations! It's very simple...easy to do during Spring Break.  Here's the recipe and thanks for looking!

Cardstock: Crumb Cake, Lucky Limeade
DSP: Tea for Two
Ink: Early Espresso
Stamps: Sassy Salutations
Accessories: Calypso Coral 3/4" ruffled ribbon, Labels Collection Framelits


Wednesday, January 23, 2013

Valentine Sucker Treats

These little Valentine treats were so easy to make.
I love Valentine colors, and the More Amore Specialty DSP does not disappoint! This pack comes with 2 single-sided laser-cut sheets that were used for the back scalloped heart. Then, I chose a piece of patterned paper from the set for the inside heart. Add a little adhesive, ribbon, a tag, and, of course a sucker, and you are set with your Valentine treats!

Recipe:
- More Amore Specialty DSP
- Cardstock: Primrose Petals, Very Vanilla
- Ink: Primrose Petals
- Hearts Collection Framelits
- Stamps: Mixed Medley
- Very Vanilla 1/8" Taffeta Ribbon
- Whisper White Baker's Twine

Thursday, January 10, 2013

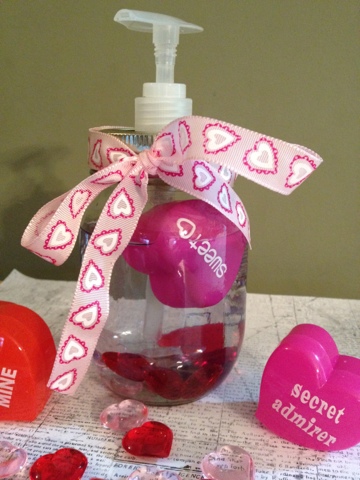
Valentine's Mason Jar

I love Pinterest! My list of projects to try has grown exponentially since I started going to Pinterest! Over the holidays, I saw several of the mason jar snow globes and soap containers. For Valentines, I decided to make a soap container using a mason jar.

I picked up a few plastic valentine hearts at the Dollar Tree and 2 soap containers at Wal-Mart. The next part, getting the soap pump through the jar lid, was the hardest. I have a drill, but haven't used in a while, so I used a hammer and nail to tap the hole. I only ended up with one scratch on my finger!  After get the pump securely in the lid, I filled the jar with the valentine novelties and then the soap.
It took almost all of both soap containers to fill the jar. Then, I put the lid on. I added the ribbon to test out how I may give as a gift. I also think wrapping up in fabric may be cute, but the hearts floating in the soap are so cute that I hate to cover them up. Happy Valentine's Day!

Sunday, January 6, 2013

Just a little sewing...

I want to step up sewing a little bit this year. And, it just so happens that Craftsy.com put out several FREE mini classes last week. One is on making bags. I watched the first drawstring bag being made and knew I could do it! These are lined drawstring bags.  Here's my first one.

I have been holding on to this chevron material for quite a while. It wasn't too bad to make, but I'm a new sewer and it took me a little longer to complete than my regular paper crafts. Maybe that's why I like paper crafting so much because you can finish a craft project in a reasonably short amount of time.

Here's the second one.

I used Stamping' Up's Designer Fabrics Essentials for this one. I love all the fabrics in that set, and can't wait to use more.

My daughter wanted to try one, so we sat down today, and I walked her through it. She made her bag a little smaller. I think she did excellent!

We are going to look for more fabric soon!

After I finished and showed them to my son, he asked why a made a Redskins bag (the crimson and yellow one)!  All he sees is football!  Which brings me to one last thing. I wish the best to my alma mater, the University of Alabama, as they play for their 15th National Championship tomorrow night! Roll Tide!!! (A houndstooth bag is in the works!)

Wednesday, January 2, 2013

New Challenges

After a looooong break from posting any projects, I've decided to make it a goal to post more of the things we are working on around here.  To help with that, I am going to participate in some of the online crafting challenges.  Here is the first.  This is for the challenge from Hand Stamped Sentiments.  The challenge is to use Primrose Petals, Pool Party, and Basic Black.  I love those first 2 colors together, but usually don't do much more with black than use as ink, so this was a great challenge. 


Recipe:
  • Card Stock: Primrose Petals, Pool Party, and Basic Black
  • Ink: Primrose Petals and Whisper White
  • Stamps: P.S. I Love You and Delightful Dozen
  • Accessories: Pool Party Ruffled Ribbon, Chevron Embossing Folder, Dotted Scallop Ribbon Border, and Scallop Oval
(All products are Stampin' Up.)
Thanks for stopping by!

Friday, October 12, 2012

Silhoutte Jewelry

Here's another Pinterest inspired project. 

I have had my Epiphany Crafts Shape Studio square punch, bubble caps, and metal charms for a little while.  Up until now, I have made a few charms and embellishments using pretty paper.  When I came upon children silhouttes in a Pinterest project, I wanted to try!  The original post I looked at suggested playing with the printer settings to get a dark profile picture.  What I ended up doing was getting the profile size that would fit in my charm.  Then, using a very sharp pair of scissors, I cut the profile out.  Next, I used a black Sharpie and colored the entire profile.  I attached this to a background paper, and then used my Epiphany Crafts tools to create the charm. 


I am very pleased with these, and plan to make a bracelet next.  This is a fun technique that is a great memory saver!

Saturday, October 6, 2012

Project Embellishment or Hair Pin

With this project, you get a two-for-one.  The original packaging on these say "Hair Pin with Bezel".  That's all well and good, and one of the finished projects looks like this.
I got these hair clips at Hobby Lobby for $1.99 for a pack of 10.  The bezel is empty, so lots of space for imagination!  For this particular one, I added a round rhinestone.  This is the same clip design that I used for one that I placed on the edge of my calendar from my previous post.  That's the two-for-one part.  You can use these clips in the traditional way...in your hair...or as embellishments on your craft projects. 

Here are all the clips I have made thus far.

Besides adding rhinestones, another way to decorate your bezel is to add decorative paper.  Using my 1/2" circle punch, I chose a few to try out.  I love the little pumpkin paper!  Then, to top it off, I added some Glossy Accents to make a nice cover.  I plan to use these alot on projects, as hair pieces, and even as bookmarks!

Thursday, September 27, 2012

Picture Frame Calendar

The best part of a homemade calendar is that you can start it whenever you want...not just the first of the year!  I came upon this awesome FREE calendar download from Heidi Swapp.  I decided to try making a flip calendar from a regular picture frame.

I picked up a 4x6 pic frame at the Dollar Tree.  I covered the frame's chipboard backing piece with a piece of decorative paper (from Heidi's Sugar Chic line).  I removed the glass from the frame.  Next, I lined up where I wanted my holes for the rings and used my Crop-A-Dile to punch holes in the frame backing and the calendar sheets. 

After labeling, stamping, and adding a few tabs and washi tape to each month, I lined the pages up and attached on the rings.  All set to start October! 

Plus, I can add pictures and journaling between the months and later form a nice little memory book for the year.  This was very easy, and you can add as many embellishments to fit your own style.

P.S. Do you like the rhinestone clip on the front page?  I'll share that with you in an upcoming post.

Wednesday, September 19, 2012

Halloween Crafting

It's time I started posting the craft projects that we have been/are doing.  Summer has come and gone, and now that school has started back, we are beginning to get back in a regular routine.  Thus, more crafting time! 

Halloween crafting is always so much fun.  I hope to be doing several different projects and will share with you along the way.

This is a Halloween tag that I prepared for my monthly stamp club.  We each made tags and swapped with each other.  It was fun, and I love to see everyone else's ideas!  I have been getting in the Halloween mood, so I wanted to do this Halloween tag.  My original inspiration came from Pinterest.  It was from a Stampin Up Connections post, so unless you are a SU demonstrator, you can't get to it. But, check out my Halloween Board on Pinterest if you are interested in seeing the difference in our tags.

Supplies: Pumpkin Pie, Whisper White, and Basic Black Cardstock, Basic Black Ink, Spooky Bingo Bits stamp set, Big Shot: Spider Web Folder and Two Tags Bigz, Basic Black 3/8" Taffeta Ribbon, and Pumpkin Pie 1/8" Taffeta Ribbon
(all from SU)

Here's the first candy holder of the year for me!  This was really fun because I actually pulled out the sewing machine to complete this.  My inspiration came from the September issue of SU's Stampin Success magazine. The combinations and embellishments for this candy holder are endless!

Supplies: Howlstooth & Scaringbone DSP, Tangerine Tango and Very Vanilla Cardstock, Black Staz-On Ink, Scallop Punch, Googly Ghouls stamp set, Basic Black 3/8" Taffeta Ribbon, Googlies
(all from SU)

More projects to come!

Tuesday, April 3, 2012

Simple Birthday Card

It has been way too long since I have had a post, but I have been doing many craft projects.  I'll try to get them all posted soon.  I have been being inspired by Teresa Collins and Heidi Swapp lately.  They have been sharing lots of cute books and projects.

This is just a simple, but pretty card that I made for my mom's birthday.  This was inspired by Teresa Collins.  From her last MyCraftChannel.com video, she gave away some phrases on her website.  I used a piece of paper from her Carolina Breeze line.  I added a little bling to the card as well.  Very simple and quick.

One other project I have been working on the last few weeks is a bulletin board announcement for a play that my daughter will be in in May.  Pulled out a few scrapbooking items for this project.

Posting again soon...

Tuesday, February 14, 2012

Happy Valentine's Day

I can't believe that it is already February and Valentine's Day! We have been so busy and I am so behind in posting projects. We have been doing things though! Let me share what's been going on since my last post.

We have had a few Upward basketball games...

 We have done a few pageants...
We have gone to a few birthday parties...

We have celebrated a few birthdays...

We have cleaned up and organized a little...

We have watched MyCraftChannel.com and fallen in love with Teresa Collins and Heidi Swapp (already loved Sarah Hamer with Sarah's Stack Up and MyPinkStamper, Robyn, on her site)...

This is one of the first books I made with inspiration from Teresa Collins and using my Cinch I received for Christmas. So fun!! I have made a few other books from Heidi Swapp's inspiration, and I'll try to post those as well.

And finally, here are the Valentine's treats for my kids' classmates.

We do alot with Smarties around here as they are a safe treat with our little one's food allergies. Just retested him this last month too, and we still have to avoid milk and eggs.

Have a Happy Valentine's Day!!

Saturday, December 31, 2011

Daily Tidbits Journal

Honestly, I cannot remember where I saw this idea, but I loved it when I saw it.  It is one of those things that I wish I had started when my children were first born, but that's ok.  My new motto for this year is that a year from now, I will have wished I started something today.  So, I start what I can, and just do it!

This is not just an ordinary box.  Inside are 183 note cards.  On each card, front and back, is a month and day.  No year. 

Then, throughout the year, I will use the cards to write down something that happens that day, no matter how big or small.  I will note the year along with the tidbit.  The cards are used from year to year.  So as the years go by, for example on 3/23, we have a record of things that happened on that day.  I would love to journal more, but I don't always make it everyday.  Then, I feel like I have to write alot.  With the cards, I am just going to write a little, and as I come upon something to include. 

Here's how I decided to keep our cards.  I had an extra plastic index card container that I got at Wal-Mart a while back for $1-$2.  Here are the supplies I used.

Supplies:
1 - plastic container
183 note cards
2 - 5 1/8" x 3 1/16" DSP (used SU!)
Corner punch
1/2" circle punch
Vinyl (used 3 colors)
Adhesive
1/4" Grosgrain Ribbon (Chocolate Chip - SU!)

I decided to just keep it simple, and only use the vinyl dots, DSP, and ribbon.  Can't wait to start writing down some tidbits and reviewing them years from now.


That's all for this project.  Now, let me share another project from today that I am quite proud of --- organizing the medicine cabinet! 

Here's the before picture:

And now here's after:

Cleaned out alot!!  Now, we can finally see what we have.  More projects like this are on the way! Happy New Year!

Friday, December 30, 2011

Rag Wreath

After more than a year, I have finally completed my first rag wreath!  I still may add an "A", but haven't decided on that yet.  I just needed to get this displayed as we took down the Christmas decor.  

These are time consuming --- but not THAT much!  I was about 3/4 of the way finished and then ran out of houndstooth material.  I sort of put it on the back burner as I started and finished other projects.  Then, when I was ready to go back to the wreath, it was hard to find the material in stock at my local Hobby Lobby.  In the Heart of Dixie, houndstooth is quite popular, to say the least!  But, I finally got the material, and in preparation for the January 9th National Championship game, I finished my wreath!  I wish the best for my Crimson Tide and hope for a great win and our 14th National Championship!

I also wanted to share the gift card holders I made for Christmas gifts.  I got the design from www.mychicnscratch.com.  The green one is exactly like her design, using SU! dsp.  For the red (cherry cobbler), by request from Cooper, I used a Santa.  He really liked it.  I used velcro to keep them closed.  I really like this design and plan to use again for gift cards.

I'm still finishing up my Christmas scrapbook, and I got a Cinch for Christmas that I can't wait to try out!  I have another New Year project that I hope to finish tomorrow and share, and I just saw on Pinterest a cute way to keep your Christmas cards for each year.  We were so bad... we didn't send out cards this year!  We'll (I'll) do better next year! Tip Junkie handmade projects

Friday, December 23, 2011

More Elf "Artwork"

Well the elves have been at it again!  This morning when the kids went looking for the elves, they found them on the table with a note.

When they looked in the mirror, they were expecting the elves to have written on the mirror. They were surprised when they saw their reflection and the elves had given them red noses! Cooper had already tried to wipe his off before I could get a picture!
They have liked this so much, that still several hours later, they still have the red noses!

Sorry I have not posted my projects as I had mentioned in the last post.  I had a stomach bug last week, and didn't feel like doing much.  Then, we've been catching up and getting ready for Christmas.  May be able to post a few things later.  If not, we'll be looking towards to New Year!

Friday, December 16, 2011

Busy Christmas Time

Note to self: for next Christmas, plan to do most of the crafts ahead of time!  As always, I have gotten so behind in my crafting.  I have good intentions, but can't find the time to get all the fun projects finished. 

A few days after the 1st, I came upon the cute idea of making a gum Advent calendar.  I made these for my kids' teachers, and even though we got them to them after the 1st, I think they still enjoyed.


Two packs of Eclipse gum will give you 24 pieces for days 1-24.  I just made a little pocket with the paper and placed the gum in the pockets.


We did have SU! club last weekend, and the weekend before that, we had a special SU! session where we worked on a scrapbook.  I'll take pics and post soon (hopefully).  I have also been working on lipstick purses for my daughter's friends.  They have been fun!  I will get those posted as well. 

But in the meantime, here's what the elves did last night.


They colored with a red dry erase marker on the kids' pictures!  They made beards, hats, and all sorts of drawings on them.  They are funny!

Christmas will be here soon, and it's a Crimson colored Christmas for me!!!

Thursday, December 1, 2011

Christmas Elves - Day 2 (2011)

Well the elves sure were naughty last night.  This morning, we found all three sitting in Cooper's firetruck.  They looked so innocent!
But then, we happened to look at the stockings, and they had hung underwear from the stockings!  I'm sure they thought they were so funny!!
What trouble these three elves can get into!!

LinkWithin

Related Posts Plugin for WordPress, Blogger...