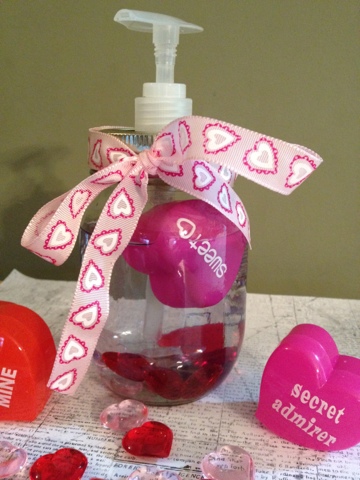
I love Pinterest! My list of projects to try has grown exponentially since I started going to Pinterest! Over the holidays, I saw several of the mason jar snow globes and soap containers. For Valentines, I decided to make a soap container using a mason jar.
I picked up a few plastic valentine hearts at the Dollar Tree and 2 soap containers at Wal-Mart. The next part, getting the soap pump through the jar lid, was the hardest. I have a drill, but haven't used in a while, so I used a hammer and nail to tap the hole. I only ended up with one scratch on my finger! After get the pump securely in the lid, I filled the jar with the valentine novelties and then the soap.
It took almost all of both soap containers to fill the jar. Then, I put the lid on. I added the ribbon to test out how I may give as a gift. I also think wrapping up in fabric may be cute, but the hearts floating in the soap are so cute that I hate to cover them up. Happy Valentine's Day!
Showing posts with label Gifts. Show all posts
Thursday, January 10, 2013
Thursday, September 27, 2012
Picture Frame Calendar
The best part of a homemade calendar is that you can start it whenever you want...not just the first of the year! I came upon this awesome FREE calendar download from Heidi Swapp. I decided to try making a flip calendar from a regular picture frame.
I picked up a 4x6 pic frame at the Dollar Tree. I covered the frame's chipboard backing piece with a piece of decorative paper (from Heidi's Sugar Chic line). I removed the glass from the frame. Next, I lined up where I wanted my holes for the rings and used my Crop-A-Dile to punch holes in the frame backing and the calendar sheets.
After labeling, stamping, and adding a few tabs and washi tape to each month, I lined the pages up and attached on the rings. All set to start October!
Plus, I can add pictures and journaling between the months and later form a nice little memory book for the year. This was very easy, and you can add as many embellishments to fit your own style.
P.S. Do you like the rhinestone clip on the front page? I'll share that with you in an upcoming post.
I picked up a 4x6 pic frame at the Dollar Tree. I covered the frame's chipboard backing piece with a piece of decorative paper (from Heidi's Sugar Chic line). I removed the glass from the frame. Next, I lined up where I wanted my holes for the rings and used my Crop-A-Dile to punch holes in the frame backing and the calendar sheets.
After labeling, stamping, and adding a few tabs and washi tape to each month, I lined the pages up and attached on the rings. All set to start October!
Plus, I can add pictures and journaling between the months and later form a nice little memory book for the year. This was very easy, and you can add as many embellishments to fit your own style.
P.S. Do you like the rhinestone clip on the front page? I'll share that with you in an upcoming post.
Friday, October 21, 2011
Halloween Anti-Bacterial Treats
I have started following a great blog at http://pinkbuckaroodesigns.blogspot.com/. Wednesday, she posted a cute project using Bath and Body Works' anti-bacterial hand gels. I thought they were so cute, and when I made an unexpected trip to the mall on Wednesday afternoon, I had to run in and pick up a few for the kids' teachers. I was so excited to find all their Halloween items 75% off! The saleslady gave me a great idea of getting the regular shape Halloween anti-bacterial gels for classmates (only $.37 each!). Of course that's what I did and you'll see those in an upcoming project.
But, I wanted to get something a little different for the teachers, so I chose the round bottles, which you can find the tutorial for the container I used at the Pink Buckaroo site I gave above. As with most projects, you can use someone's idea as inspiration, and then make it your own with your embellishments. Here's how mine turned out.
Here's a few "behind the scenes" shots of making this project. For the tags, I only have one size tag punch, but I like the layered look. So, I used the square punch to make a piece that fits nicely within the tag.
Also, I wanted to stamp "To" and "From", but I don't have a good Halloween tag stamp. So, I found a Christmas one that would fit on my tag, used my SU! black marker, and only colored in what I wanted to show up on the tag. Custom made! I thought I would share this because I have a friend that is just beginning stamping, and she asked a question about how to get different colors on stamps. As it turned out in that example, it was with markers. When you are use to doing something, you sometime think everyone just knows how to do it too!
Pop dots are used on the front embellishment along with googly eyes on the stamped images.
These were fun to make, and really don't take that long. I have a few more to make using the "regular" shape bottles, so we'll tackle that this weekend!
But, I wanted to get something a little different for the teachers, so I chose the round bottles, which you can find the tutorial for the container I used at the Pink Buckaroo site I gave above. As with most projects, you can use someone's idea as inspiration, and then make it your own with your embellishments. Here's how mine turned out.
Here's a few "behind the scenes" shots of making this project. For the tags, I only have one size tag punch, but I like the layered look. So, I used the square punch to make a piece that fits nicely within the tag.
Also, I wanted to stamp "To" and "From", but I don't have a good Halloween tag stamp. So, I found a Christmas one that would fit on my tag, used my SU! black marker, and only colored in what I wanted to show up on the tag. Custom made! I thought I would share this because I have a friend that is just beginning stamping, and she asked a question about how to get different colors on stamps. As it turned out in that example, it was with markers. When you are use to doing something, you sometime think everyone just knows how to do it too!
Pop dots are used on the front embellishment along with googly eyes on the stamped images.
The round gels fit so nicely in the circle. In the tutorial, you will see that the 1 3/4" circle punch is used.
These were fun to make, and really don't take that long. I have a few more to make using the "regular" shape bottles, so we'll tackle that this weekend!
Friday, August 12, 2011
My Pinkalicious Blog Hop
I am participating in My Pink Stamper's Pinkalicious Blog Hop! The challenge is to show your style by making your favorite thing. I decide to decorate a gift bag because I love getting gifts ready for others.
I used some of my favorite paper and ribbon colors --- zebra print --- and a cupcake! I used the My Pink Stamper "Sweetest Cupcakes" stamp set. The punch used along the bottom is from Stampin' Up. I cut the cupcake and the tags from the Celebrations cartridge.
My daughter has a birthday party to go to soon, and the birthday girl is turning 7, so that's the reason for the "7" on the tag. I'll add her name on the other tag later. Thanks so much for looking!

I used some of my favorite paper and ribbon colors --- zebra print --- and a cupcake! I used the My Pink Stamper "Sweetest Cupcakes" stamp set. The punch used along the bottom is from Stampin' Up. I cut the cupcake and the tags from the Celebrations cartridge.
My daughter has a birthday party to go to soon, and the birthday girl is turning 7, so that's the reason for the "7" on the tag. I'll add her name on the other tag later. Thanks so much for looking!
Thursday, August 4, 2011
Let's Eat Cake!
My daughter and I love to watch Cake Boss. We dream of one day being able to decorate cakes like Buddy and his crew. In the meantime, we gave Emilee a Girl Gourmet cake decorating set for Easter. It comes with the cake and fondant mixes. She attempted one several months back, but wasn't too pleased with it. We got the kit out the other day and tried again. It was a success. She was very proud of her cake, and I was too!
See how the card opens up. You can write your message here. There is a little slit cut up near the ribbon where you tuck the tag closed.
So of course, we need a card or something to match. I decided to use my Big Shot and try out a new Sizzix die I got a few months ago from Stampin' Up. It's called Bigz Two Tags, and, like the name, cuts out two different tags. I always need tags for gifts -- at the last minute. These were easy to cut, and fun to make with the different stamp sets. I love the Melon Mambo color as well.
Materials (all from Stampin' Up!)
- Melon Mambo Designer Series Paper
- Melon Mambo ink
- White cardstock
- Cute by the Inch stamp set
- 1 1/4" Square punch (use with stamp)
- Corner Rounder punch
- White ribbon (Really wish I had Melon Mambo, but don't have right now)
See how the card opens up. You can write your message here. There is a little slit cut up near the ribbon where you tuck the tag closed.
Below is a picture of the second tag. You could also use this to make little bookmarks. The die cuts out a scallop at the top, so when I was looking for a stamp to use and came across the So Many Scallops set, I thought it just might work. And it did!
Materials- Melon Mambo Designer Series Paper
- Melon Mambo ink
- White cardstock
- So Many Scallops stamp set
- Scallop punch
- Pop Dots
So now, I'm up by two on my tags. By the way, that has been one of my goals every January... make tags (for Christmas, birthdays, etc.) to have on hand whenever I need them. I'm so far behind!
Saturday, July 30, 2011
Vinyl on Baskets and Trays
We found some really cute paper trays and plastic containers to use for organizing. These are perfect to add vinyl on, so here's what we tried.
These are the paper trays, and I really like these! Mine is the "Scraps" one. It will go in my craft room and get lots of use. The other one is for a friend who is a teacher. I used the Car Decals cartridge to cut "SCRAPS" and Stone Script for "Mrs. Griffin" and the tiger paw. I'm going to need to get several more of these trays for other projects!
This is my "To Do's" bucket that I leave out on my counter. It's a catch-all for everything I need to focus on that week...magazines, bills, forms, books, etc. I'll tell you more about those cute little notebooks beside it in a later post, but you should know that I always have lots of notes in my "To Do's" bucket! I used the Hoot 'N Holler and Plantin Schoolbook cartridges to cut the vinyl.
Tuesday, July 26, 2011
Gumball Machine
I wanted to share the cutest craft that my daughter made during a fun afternoon with the children at church. Our children's director came up with the neatest idea for them. They made gumball machines using flower pots, a glass bowl, and a wooden ball. Can't you see so many possibilities for this during the different holidays?
Emilee's is just the cutest and all girly! It fits her perfectly and will look great in her room! What a fun activity!
This inspired me to create a card using the "Just Because" Cards cartridge. The jar in the cartridge booklet actually contains gumdrops, but I made gumballs instead. The card is cut at 5", but I cut the gumball (gumdrop) container at 6". The paper, ink, and punch are from Stampin' Up. I used a My Pink Stamper stamp from the Sweetest Cupcakes set. Thanks for looking!
Wednesday, July 20, 2011
Cupcakes!!
Sorry I went for a while without posting. We have had alot going on with summer and all 3 kids at home!! But, I have been doing some projects, and now I need to get caught up on posting them.
My youngest son is allergic to milk and eggs, so we have to be very careful what he eats. The "normal" childhood treats can be very dangerous for him. So, we're learning to deal with it and make adjustments when we can. Several years ago, I found a recipe for a milk and egg-free cake and modified an icing recipe for him. Like most kids, he could care less for the cake, but loves the icing. The cake is ok, but is different from a cake made with eggs, so when I make cupcakes with this recipe, they are usually all for Cooper!
I have had my eye on the Cricut Lite cartridge Cupcake Wrappers for quite a while, and I finally got it at Walmart.com using their cartridge bundle deal. I was really excited to hold the booklet and see all the wrappers I can create. One in particular caught my eye. I think it is suppose to be dog prints, but I see TIGER PAWS. Our high school's mascot is a tiger and the colors are crimson and white. I cut the wrappers at 8.2".
There is a wrapper for any occasion, plus I see using several of these designs with other projects. I'll cook up more cupcakes soon and create some new wrappers -- they really make it easier to hold the cupcakes and the kids love to pick out which one is for them.
Thanks for looking!
My youngest son is allergic to milk and eggs, so we have to be very careful what he eats. The "normal" childhood treats can be very dangerous for him. So, we're learning to deal with it and make adjustments when we can. Several years ago, I found a recipe for a milk and egg-free cake and modified an icing recipe for him. Like most kids, he could care less for the cake, but loves the icing. The cake is ok, but is different from a cake made with eggs, so when I make cupcakes with this recipe, they are usually all for Cooper!
I have had my eye on the Cricut Lite cartridge Cupcake Wrappers for quite a while, and I finally got it at Walmart.com using their cartridge bundle deal. I was really excited to hold the booklet and see all the wrappers I can create. One in particular caught my eye. I think it is suppose to be dog prints, but I see TIGER PAWS. Our high school's mascot is a tiger and the colors are crimson and white. I cut the wrappers at 8.2".
There is a wrapper for any occasion, plus I see using several of these designs with other projects. I'll cook up more cupcakes soon and create some new wrappers -- they really make it easier to hold the cupcakes and the kids love to pick out which one is for them.
Thanks for looking!
Tuesday, June 28, 2011
Gift Box
Yesterday I showed the acrylic cups decorated with vinyl. Now to complete the gift, let's add cute wrapping. I made a box using the Cricut Lite cartridge Slumber Party. This cartridge is a must for those pre-tweens and tweens! My daughter and I have several projects planned with this cartridge, and believe me, there will be alot of PINK used!
I wanted to see how big of a box I could make with a 12"x12" piece of cardstock, so I used my Gypsy. Turned out that the sides are approximately square at 3.75" each. We layered each of the 4 sides with the black circles and girly items. Then, we placed the cup inside and added some light pink crinkled paper. Tied some clear wrap around, and the gift was ready!
Supplies for box:
12"x12" pink cardstock (for outer box)
black, light and dark pink, red, and white cardstock (for sides)
red-line tape (Need to use strong, permanent tape for the box)
Slumber Party cartridge
Monday, June 27, 2011
Vinyl on Cups and Water Bottles
Love using vinyl!! There are so many things you can decorate with vinyl. These pictures are just two of the projects we like to do.
My older son loves water, and needed a water bottle for baseball season. After we found the perfect bottle for him, we had to personalize. I love finding deals, so I am always on the look-out for things to put vinyl on. We found this water bottle at Dollar General for about $2. Makes a great gift as well.
I enjoy decorating acrylic cups too. There are so many possibilities. I love my new black and white zebra print vinyl! I have houndstooth as well, so many more projects with vinyl to come!!
And of course, my favorite picture with this project!!
I have a super cute box that I have made that will be so cute to partner up with an acrylic cup for a girly gift. I will share that tomorrow!
My older son loves water, and needed a water bottle for baseball season. After we found the perfect bottle for him, we had to personalize. I love finding deals, so I am always on the look-out for things to put vinyl on. We found this water bottle at Dollar General for about $2. Makes a great gift as well.
I enjoy decorating acrylic cups too. There are so many possibilities. I love my new black and white zebra print vinyl! I have houndstooth as well, so many more projects with vinyl to come!!
And of course, my favorite picture with this project!!
I have a super cute box that I have made that will be so cute to partner up with an acrylic cup for a girly gift. I will share that tomorrow!
Subscribe to:
Posts (Atom)


